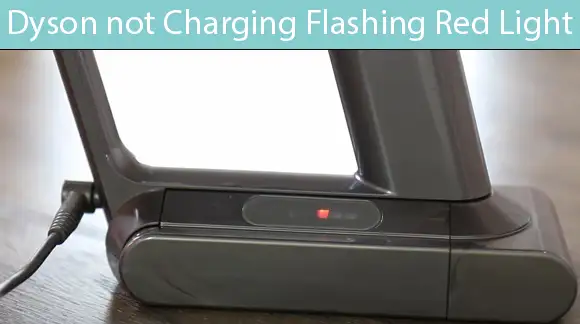
You plugged in your Dyson vacuum cleaner with the charging cable, but it didn’t charge, instead, it displayed a blinking red light, am I right here? According to a Dyson employee, 99% of the time that a Dyson doesn’t charge and displays a flashing red light, is an indication that there’s a defect present inside your vacuum cleaner’s battery.
The probable cause of this issue is linked with the wear and tear of the battery and the most viable solution to work your way around this issue is to get your hands on a brand-new battery and replace it with the defective one to ensure smooth running.
Old Dyson Vacuums – Light Indication
Dyson vacuum cleaners are equipped with LED lights that display different colors according to the issue in your vacuum cleaner. Here are a few light indications that are relative to your current issue. However, these aren’t confirmed by the official Dyson team but are an opinion of the majority of Dyson users present on various forums.
- Static red light means that the battery is faulty or broken.
- Blinking or flashing red light means that the vacuum needs to be charged.
- If the red light flashes more than 12 times then your Dyson’s battery has become faulty.
- If a red light blinks less than 12 times then your Dyson’s motor has become faulty.
Also check how to fix if your Dyson V11 animal filter light flashing.
Dyson Battery Replacement
Before getting your hands on a brand-new battery, here are some factors that you must consider:
- Check whether your Dyson vacuum supports a clickable battery or a screw-on battery. In clickable batteries, the battery can be inserted or removed just by pressing a button whilst in a screw-on battery you don’t have that option since the battery is attached with the help of screws.
- It’s also helpful to know your Dyson’s model and serial number. This will allow you to find the exact battery pack which is meant for your vacuum cleaner.
If you haven’t spent much time with your Dyson, then you might be in luck since Dyson offers a 2-year warranty. Therefore, you can cut down on the expense of buying a new battery and get one directly from Dyson, talk about luxury!
Dyson Battery Replacement – Step-by-step Guide
Once you’ve considered all the factors mentioned above, now is the time to replace your worn-out battery with a brand-new one by following the steps below:
Screw-on Battery
Remove all the other accessories near the battery. This will allow you to access the battery easily without putting much effort.
Remove the screws that are holding the battery in place.
Attach the new battery properly to the connector and tightly hook the screws.
Reassemble the accessories or vacuum parts that were removed before.
The blue LED light will denote the battery’s health. It is advised to first charge the new battery and then start using the vacuum cleaner.
Clickable Battery
- Click the red button present at the bottom-mid of the battery to disengage it.
- Attach the new clickable battery to the connector properly. You might hear a ‘click’ sound once the battery is properly attached.
- Charge the battery properly before use.
NOTE: Clickable batteries are comparatively easier to replace than screw-on batteries and don’t require you to disassemble other vacuum parts or accessories.
Dyson V7 – Flashing Red Light
Does your Dyson V7 flash a red light every time you try to turn it on for use? If yes, then there can be two reasons for this.
- A flashing red light on a Dyson V7 typically denotes either a fault with the battery or with a motor.
- To know for sure which one of the two is the problem, you can count how many times the red light flashes on your Dyson V7.
- When the red light flashes more than 12 times, it is an indication that your vacuum’s battery is faulty.
- When the red light flashes less than 12 times, it is an indication that the motor of your vacuum cleaner has become faulty.
With time, the lithium-ion batteries present in your Dyson V7 will start to wear off. The batteries typically take out around 500 charge cycles after which they start to decline significantly.
Interesting Fact: Dyson users interest piqued recently about How to store Dyson attachments.
Dyson V7 – Battery Replacement
Although the V7 is a performance upgrade from the V6, however, the design makes it relatively difficult to replace the battery pack with a new one in case of any casualties.
The following steps will help you work your way around changing the battery pack of your Dyson V7 model.
NOTE: To make this replacement process a success, you must possess a Philips Head Screwdriver.
- Remove the pink-colored bin by clicking on the red button.
- Remove the cowl by pressing the red button present at the base of your vacuum cleaner.
- To separate the motor unit from the battery, you need to remove three screws, two of which are present at the base, while the third is present above your vacuum’s handle, behind the motor head.
- Now you can replace your battery with a new one! To reassemble everything back together, repeat the same process in reverse.
IMPORTANT: Don’t press your vacuum’s trigger until fully reassembling all the vacuum parts of your Dyson V7.
Here’s you can understand what’s the normal batter life of Dyson V7.
Dyson Vacuum Stopped Charging
This issue is attributed to a defective battery pack, in most cases. While this is the case typically, there are, however, other factors that should be taken into account such as the charging cable.
If your Dyson vacuum cleaner has stopped charging, these might be some of the places to look for the cause:
- Check whether there are any cracks or physical damage present on the casing of your vacuum’s battery pack.
- Check whether there are any defects in the charging cable.
- Also check whether the power socket in which the charger is plugged works correctly and provides the right amount of voltage.
- Any blockages or hurdles present in the vacuum cleaner can also cause it to go into a cutout for safety precautions.
Since the problem typically revolves around a defective battery, it’s good idea to buy a new battery. If you’re still under warranty, then we suggest to get your new battery pack directly from Dyson.
However, if that’s not the case, then you can buy new batteries from reliable third-party manufacturers. If the problem lies in your vacuum cleaner’s charging cable or other accessories then you can check them out here.
Dyson Vacuum not Charging – Red light
When you plug in the charging cable to your Dyson vacuum cleaner and it starts to display a flashing or blinking red light, then this means that your Dyson vacuum needs a new battery.
The only viable and efficient solution to this problem is to replace the defective battery with a brand-new one.
For future reference, you can use these tips to prevent catastrophes such as this:
- Keep the usage of ‘turbo mode’ on your vacuum cleaner as low as possible.
- Charge the battery when its percentage reaches 20%. However, don’t overcharge it i.e. disconnect the charger after the percentage goes above 80 – 85%.
- The charging cable leading from the power socket to the charging port on your vacuum cleaner shouldn’t be too tight due to increased resistance.
- Maintain your vacuum cleaner’s filter and replace them after every 12 months.
Conclusion:
When your Dyson doesn’t charge displays a flashing red light, this is an indication of a fault present within the vacuum cleaner’s battery. The only logical way to work around this problem is to buy a brand-new battery that matches the model and the serial number of your Dyson vacuum cleaner.
For other possible fixes read article thoroughly. It can help you in saving few bucks by identifying the pain point. If Dyson is not charging and flashing red light then there’s a possibility that charging cable is needs replacement.

Hi Everyone.
I’m Safeer. I always loved trying out the latest cleaning and home products and sharing my thoughts about those products with you awesome people. Whether it’s related to general cleaning or it includes cleaning with high-tech vacuum cleaners, I always test them myself and then share valuable opinions with you. Additionally, I also let you know how to resolve particular issues of vacuum cleaners. To look for detailed reviews and troubleshooting tips about vacuum cleaners VaccumCleanersMag is the perfect abode for you.